Friday 24 December 2010

A week of lunches

Before I arrived here, I asked my friends what there was to do in Hongkers.. and it was pretty much the answer across the board - eat and shop.

Seeing as I am currently in no mental state to shop - still traumatised by the big pack - and I pretty much have to eat, I thought I'd share a week of my lunches. Well technically a working week as I only took photos of my lunch at the cafeteria at work.

Monday: Roast Duck and Char Siu on Rice. I was impressed by the price (HKD21) but I've had better in a lot of other places

Tuesday: Baked Pork Chop on Rice in Tomato Sauce. One of my favourite dishes back home and this didn't disappoint. For HKD24, it was filling, tasty AND super speedy (unlike the usual 20 minute wait for it to be baked)

Wednesday: Daily Thai Combo. There's a variation on the Thai combo every day in the cafeteria. HKD35 gets you soup, spring rolls, fried rice, fried chicken, lemongrass pork and rice puddings (with corn inside which was unexpected). Great value and very yummy.

Thursday: Black Pepper Beef and Fried Egg on Rice. I was very happy with this coz there was so much sauce! I love it when my rice gets all mushy and tasty *slurp*. The sausage looks a bit odd I know but it was delicious. The iced lemon tea and soup were part of the HKD35 set meal.

Friday: Thai Pineapple Fish Set. The cafeteria sure does Thai food well! I wasn't that hungry but I finished most of it before I realised. Pity the layer cake was bland. It looked deceptively flavoursome. HKD32.

Awesome food at awesome prices at work! Admittedly I think I will get sick of eating this sort of food day in day out, and there are a few other options such as a salad and sandwich bar, a Japanese place and a Western deli-type counter, but since it's all new to me, I'm really enjoying the food. The added bonus is that these 5 lunches have worked out to be a little less than AUD20 with the current exchange rate. YAY!

PS - Hopefully I'll have better photos now as I've finally upgraded to the iPhone 4 - you can see that Monday and Tuesday's photos are a lot darker due to the older phone but they improve from Wednesday onwards.

Tuesday 21 December 2010

Home for now

Work has kindly put me up in an apartment near my place of work - and from what I've been led to believe, it's a very decent size for one person in HK terms. Here's the grand tour...
The 'foyer'. That's my front door, with a decent sized shoe cupboard. That thing that looks like a crack in the wall is actually a bit of dried twig from a dried flower arrangement.


This is what you see when you turn around - the dining table and doors to the kitchen and master bedroom.


A full view of the lounge area from the dining table - with the suitcase still half unpacked. There is a balcony behind the (icky) curtains but seeing as I'm over 50 floors up and I don't really think it's that safe out there I doubt I'll be spending a lot of time there.


The odd shaped kitchen that also holds my washing machine. Well stocked with utensils.


The master bedroom. I say this only because the bed is bigger. I have realised though that the only reason the bed is bigger is because half the mattress is perched on the giant window ledge. They sure know how to make use of the space over here I have to say.


Bedroom 2 - the mattress seems to be wider than the standard single bed, but a lot shorter. I just fit if I lie stretched out. Hopefully any visitors I have will be midgets.


The bathroom, equipped with a bathtub and shower curtain with cartoon zoo animals on it behind the door.

I can choose to continue staying here if I want to, or move elsewhere to be closer to busier parts of HK, but it's early days yet so I plan on taking my time with the decision. Plus I'm terrible with morning starts so for now, the closer I am to work the better :)

Oh and I'd like to point out that the couch is a La-z-boy one. Perfectly positioned to recline in front of the TV a la Joey and Chandler in Friends :D

Monday 20 December 2010

A Great Start

So the move to Hongkers is finally happening. After a week of delays that I suspect have given me a white hair (eep!) I got myself a ticket and made my way to the airport early on a Sunday morning.

I checked-in, went through immigration and after the pain of packing, decided I didn't need any more things, so I wandered through duty-free towards my gate with the hopes of just relaxing on a chair somewhere when look who I bumped into:

Why good morning to you too Mario!

That really perked me right up - I sure do love a bit of Mario so I figured it was a good sign that my new adventure was going to be great! I didn't know the half of it though - within the hour, I was upgraded to business class!

Credit goes to a very very nice person who happened to be working behind check-in

I've only been in business class once ever before, but this was a whole different experience because Cathay's business class are diagonally aligned pods that fold all the way down into a bed, with high 'walls' for lots and lots of privacy. Especially great for single travellers!

There's even a footrest - yay

I settled in and decided that I was going to stay up to check out what they would serve for breakfast and lunch - plus I didn't really want to sleep too much even though I was super tired since I needed to be up and ready for work the next day without being jet-lagged.

Here were the breakfast offerings:

Juice, fruit and a croissant (which was a bit cold and tough unfortunately)

Mozzarella, basil and tomato fritatta with chicken sausage, bacon, sauteed kipfler potatoes, spinach and mushroom - yummies

For lunch:

Starter: Smoked salmon, grilled scallops and marinated baby octopus with mixed salad - very tasty but looking at the octopus grossed me out a bit so I tasted a bit then left it

Main: Lamb korma, turmeric rice and vegetable jalfrezi - not bad but by this stage I was pretty full so I only had a bit

Dessert: Port with a big slice of strawberry and pistachio cheesecake

To finish off: Another glass of port and a praline (pity it was only one)

By now I was ready for my nap but I still forced myself to stay awake a bit longer and watched a couple of movies, Get Him to the Greek (better than I expected) and The Other Guys (highly entertaining). Yes I like mindless comedies, especially when on a plane :)

I finally succumbed to a bit of shut-eye before waking up to an announcement that we were about to land. Oh and before I forget - the best bit! I got a cute toiletries bag with the standard socks, eyemask and toothpaste/brush, with a couple of mini Murad products included.


I think it was one of the best flights I've ever had! If I was rich, I'd be flying business class all the time! I guess I can keep dreaming right? ;)

Friday 10 December 2010

Hong Kong!!

It's been awhile since my last post but a lot has been happening for me. In a nutshell, I'm off to work in Hong Kong for a year! It's all happened within a space of 2 weeks so I've been madly rushing around finishing up with my old job (I'll miss you guys!) and worrying about admin, packing (what do I bring??) and all sorts of bits and bobs.

I still have a lot of running around to do but I thought I'd share a snapshot of the chaos I'm experiencing right now.

What have I forgotten....

These are just some of my things to be packed - note that there are no shoes, jeans, electrical applicances (GHD!) or bags in the picture yet. *eeep*

I also don't think there is space for a sewing machine in there :(

Tuesday 30 November 2010

iPhone Snapshots - November 30

Anyone remember having these as a kid?

There's just something about the texture and flavour of these jelly cups that I love :)

Sunday 28 November 2010

Neckie the giraffe

Now my previous post about soft fill was probably a bit mysterious, but all for a good reason. I was making a surprise for Frannie for her birthday! Seeing as she reads this blog regularly I didn't want to give the game away.

I had already gotten her a copy of the super awesome Zakka Sewing craft book but if time permitted I was going to try to make up a Mrs Perkins giraffe for her since I really didn't want her stealing mine.

It was a bit of a mad rush - and gee those horns always get me - but I made it!

Girl or boy? Hmmm...

I wasn't sure if the giraffe was going to be a boy or a girl so I picked fairly neutral colours - beige with a light white pattern for the body and a very pale turquoise for the feet and horns.

Matchy-matchy

Can you see a bit of a colour theme happening with the wrapping paper? I've never felt quite so coordinated ;)

I added a bit of the matching ribbon around the giraffe neck (gifts should be at least partially wrapped don't you think? heehee) and we were ready to go.

After a rather lovely meal at Maze (thanks again Frannie!) the gifts were opened.

Hurrah! New friends!

Coined with the apt name of Neckie, it was decided that she was a female giraffe. Although it wasn't my intention, Ray pointed out that Neckie was really channelling Tiffany & Co, what with her (almost) duck egg blue ribbon and mane colouring.

What can I say? The girl has high standards ;)

HAPPY BIRTHDAY FRANNIE! x

***EDIT - click here if you want to see how Neckie is settling in to her new home***

Saturday 27 November 2010

Pretty paper

I love pretty wrapping paper. It can seem like such a waste though when it ends up getting crushed, crinkled and ripped up, especially with some of the prices being charged these days. I know I'd much rather put my pennies towards the gift itself rather than the package it comes in!

Cue a rubber stamp, an inkpad and a roll of white paper.

I loooove the colour of the ink

Just repeat as you see fit and *stampstampstamp*, a sheet of pretty wrapping paper!

Tuesday 23 November 2010

Totally stuffed

Look at this lovely lot of soft fill in my hand.


It looks so fluffy and soft and cushy and almost like a heap of frothy light bubbles, glistening in the light.

Well it's NOT. Do you know how much of this you need to actually stuff anything?? That amount you see there looking oh-so-innocent would probably be able to stuff something smaller than those little pellets with a toy you get in a Kinder Surprise. Just.

Stuffing anything larger than the aforementioned pellet takes a surprising amount of time and energy.

I now have very sore fingers. Stupid soft fill.

Tuesday 16 November 2010

Mario Love

When I was growing up, we were never allowed to have any gaming consoles in the house. A computer yes, but not any Sega/Nintendo/Atari entertainment. I don't think we were any worse off for it, but to this day I kind of suck at console type games.

I had a childhood friend whose house I would visit when I was younger and pretty much force to drag the Nintendo (NES) out and play Super Mario. I'd get blitzed every time seeing as she got the play it every day, but I didn't care. The game was so much fun!

These days I can probably afford a plethora of gaming consoles, but find they aren't much fun if you don't have anyone to play them with. Plus I have tendency to like cutesy games that boys just don't really want to play all that much, so I haven't really gone all out with buying them. My Nintendo DS however, has been a fantastic purchase. Hours of entertainment was had when I was living and travelling around Europe - it helped waiting at airports, sitting on trains and generally filling in boring waiting bits that happen when one travels. And yes, my favourite game was Super Mario.

Variations on the game such as Mario Kart and Super Paper Mario haven't been bad either, although I'd advise people to not bother with Princess Peach. Boring and slow! Well I thought so anyway.

Like I said, I'm still pretty sucky at console games, but someone said to me recently when we were playing it in multiplayer mode on the Wii that they had never seen me so worked up about a game/sport/competition ever. What can I say - I love it! Who can resist the distinct sounds (1-up mushroom!), level music and general cuteness of the game? I look at Yoshi and I just want one - so when I got this awesome present from Linderrr, I was one happy Mario fan.


I love love LOVE IT!

Sunday 14 November 2010

Springing into Shape

After my efforts to get into running, I was told not to run anymore since my stupid knee was playing up. Again. Urgh.

Unfortunately I had already signed up for the last race in the Spring into Shape fun run series with meJoolie, so I figured I'd do my best and would just walk the 4.3km course if the knee started to hurt.

I managed to finish the course with a combination of slow jogging and walking in a time of 33:03. That in itself means not too much at all to me seeing as I've never done one of these before but once the knee heals up, I'd like to use it as a benchmark to beat.

Check us out - still smiling post-race

To celebrate finishing our first run (more walk in my case), we took advantage of the complimentary 10 minute massages post-race and scored some freebies (shower gel, juice, a health bar and the Sunday paper). We then rewarded ourselves with a hearty breakfast at Cafe Panette - no wonder we were smiling!

Eggs a la Mer with a roesti on the side

I have to say that I enjoyed myself a lot more than I expeted to. We were lucky hat on a really wet weekend it didn't rain while we ran! I'm hoping that phone calls tomorrow to an osteo and an acupuncturist will mean I can try out another fun run soon - being injured is so frustrating, especially with summer on the way.

Saturday 13 November 2010

Dress upgrade.... or is that upsize...

I've made this pattern (Butterick B4701) up 3 times now, once sized down to fit a 2-year-old flowergirl and twice for Princess S in a size 4. She's fast outgrown them but apparently the Princess loves her dresses so much that she won't let them go, so I thought I'd make her an 'upgrade' of sorts. She's just turned 4 and is about average size for her age, so the Butterick pattern must really cater to smaller-sized kids! Based on that I decided to just make the dress up in the largest size for the pattern I had, which was a 6.

I found a really pretty pink and white stripe cotton to make it up in. Unfortunately it has turned up looking a little red in the photos, so you'll just have to take my word for it.


This was my first effort working with stripes and I had decided at the start that I would try my best to match up any stripe joins in the fabric, so I was very conscious of cutting the fabric using the print as a guide as opposed to the fabric grain.


Now I know a 4-year-old isn't going to notice details like stripe matching, and if I didn't point it out, no-one else would either, but I'm sure everyone has a bit of anal-retentiveness in them. I just happen to have a larger dose of it :)

Woohoo! All lined up!

I have to admit I was really pleased with the result. Matching up the stripes around the zip was a bit of an effort, but as I tend to find zips annoying to sew in general, it was nothing new to do it a few times over.

My hand-stitching skills are also improving - you can hardly see the thread where I've sewn the lining to the dress *yay*


I guess it's true what they say about practice making perfect :)

Sunday 7 November 2010

How not to prepare

Kimba and I were supposed to have started making up some super cute sock owls for an owl mobile using a pattern we had both bought from Craft Schmaft quite awhile back now, so we booked some time in this weekend.

Aren't they cute? Details and photo source here

Unfortunately we didn't have any socks at the ready - so to solve this problem we decided to go shopping!

4 hours, several credit cards and multiple shopping bags later, I found some gorgeous little baby socks for my mobile.


We were good to go! Pity it was time for dinner. At least we'll be prepared for next time - maybe.

Wednesday 3 November 2010

iPhone Snapshots - November 3

Afternoon tea in the office, thanks Tammy!

Tuesday 2 November 2010

Superhero Blee

A long overdue birthday present started to sort itself after I found this fun flannel print.

I whipped them up into some PJ pants (cropped, in case you were wondering why they look so wide - and no he's not a midget even though there has been talk of a height complex...)

And added a personalised touch - just for Blee.

Hope he likes them.

Friday 22 October 2010

I should be a plumber

OK so maybe that's an exaggeration but I was horrified the other day when in the midst of cleaning out a bag full of jewellery I heard what sounded like something sliding against the porcelain of the sink. I turned around quick enough to see the flash of something shiny falling down into one of the little drainage holes in the sink.

My first thought was 'OMG what was that?', followed by 'OMG it better not be anything expensive!'. Since I have bits of jewellery all over the place I really wasn't sure if an earring was missing its other half or if a pendant had fallen off a necklace chain. Stress stress - what if it was a diamond??

My Ma advised me to ask a neighbour for help rather than call the plumber - neither of which were appealing to me since even though the neighbour in question is lovely, I just don't know him very well, and plumbers can be expensive - totally not worth it if the lost item was just a trinket!

I plugged up that particular sink and after a couple of days of being in denial and pretending it hadn't happened, I mentioned it to a workmate. Coincidentally, he had been doing some pipework under his house. According to him, it wouldn't be that difficult to fish something out of the sink if it hadn't been already washed away by running water (which I had made sure hadn't happened). As long as the piping was moderately modern and the person who installed it wasn't too heavy-handed, it would be a simple DIY job.

Apparently all you need to do is lay a few towels under the pipe, unscrew the screwy bits that join the pipes up (sorry don't know what the technical term for this is) and tip out whatever is caught in there.

It sounded good in theory, but I was dubious. After all, on TV, when you see a plumber go under a sink, he has a toolbox with spanners and screws and allsorts that are put to use. Could it really be as simple as that?

Turns out that yes, yes it is!


Top screwy bit unscrewed successfully!

I managed to unscrew both ends using a towel to protect my palms (doing it without really hurt!). My workmate failed to mention that the inside of the pipe was going to be gross and stinky, and I hadn't thought that far ahead since, y'know, I was dubious and all, so I quickly poured out the contents of the pipe into a bucket and restored the piping to all of its former glory. *bleurgh*

Turns out, it was an earring that had fallen in, and a cheap one at that. Probably wasn't worth the grossness of the whole experience, but what was worth it was learning how to do it. Sure, it was a lot easier than I thought it would be, but I've never been handy around the house so I felt pretty awesome.

Here's hoping that this random post ends up being helpful to some of you other non-handy people out there :)

Thursday 21 October 2010

Going dotty

I've found that no matter which fabric store you go to, there is always some sort of polka-dotted material around. My Ma absolutely loves it since she adores using polka-dots in her quilts.

Me, I fluctuate. I tend to think that it just has to be fit for purpose - Is it in fashion? Does it suit the style of the garment? Is it being used inappropriately for a large item (this giving anyone who looks at it a headache)?

After trawling the interwebs though I think that polka-dots nearly always look great on little girls' dresses. Check some of these out.
Rare Editions Girls Pink Polka Dot Dress from Treasure Box Kids

Carter's Baby Dress, Baby Girls Polka Dot Dress from Depot.com


Bonnie Jean Baby Little Girls Fuchsia Polka Dot Spring Dress from Sophias Style


Aren't they all super cute? SY2's first birthday is coming up and I now have a few ideas up my sleeve... I just hope I have time before I head off on my holidays!

Thursday 14 October 2010

Burdastyle dress: 114-5/2010. Take 2.

So I wasn’t 100% happy with the Burda dress I made before and decided that I’d try to change a few things about it and make another version using a navy cotton with a large amoutnt of white print on it – I thought the use of white would make it a lot more summer-y.

I loved the print the moment I saw it!

The Plan
I thought it through and decided I wanted to do the following:

1. Make the back section more conventional instead of having the cross back pattern
2. Eliminate the need for 2 pieces for the front of the dress
3. Make the skirt either a gathered skirt or a pleated one, without the tiers.

1. The Back
This was fairly easy – I just used the original Burda pattern as a guide. I made sure that the tops of the shoulder straps still matched the pattern so they’d line up with the front shoulder straps, then drew a curved line from there to meet the underarm seam. I did this freehand since I didn’t know if there was a particular technique around on how to measure this up. It seemed like a logical enough approach in my mind.

2. The Front
Now this was a piece of cake. I just took the front piece and cut it on the fold (taking it in just a tad as the original pattern called for the 2 front pieces to overlap).

3. The Skirt
This step had me torn. Part of the reason I had picked the particular material was because it was thick enough not to need any lining. As a result, it was more likely to add bulk to the join and make me look a lot thicker around the waist. Based on this I reluctantly decided to have a go at pleating the skirt instead of gathering it. I don’t know about the rest of you, but I find pleating hard work! Still, I figured that avoiding doing it wasn’t going to make me any better at it so a-pleating I went.

The Execution
I started by drawing evenly spaced lines on the back of the material for the pleats. I had no idea how much material I needed and how to measure how many pleats to put in so I just decided that I would just pleat the length of material and then cut it to fit as the skirt option.

Pencil lines

I had a lot of trouble working out the best way of sewing these up. I ended up folding the pleats on the pencil mark, pinning them in place and then sewing up and down the seam using the machine foot as a measuring guide so that I'd be able to replicate the measurements across the skirt.

I really don't know if this was the best method but it seemed to kind of work...

So I kept repeating the pattern across the length of fabric I had set aside for the skirt and ended up with a consistent pleating pattern throughout.

On and on and on - it took ages!

I actually lie as I managed to get distracted along the way and incorrectly sew an extra seam where it shouldn't have gone. Urgh. Luckily it was close to one end of the fabric so I was hoping that I wouldn't need the whole length for the skirt - either way I was so exhausted from all the pleating that it was either pretend that it hadn't happened or chuck the whole project, so there are no pictures of the stupid thing to be posted :)

I then basted the skirt to the newly-fashioned bodice to get an idea of what the dress would look like.
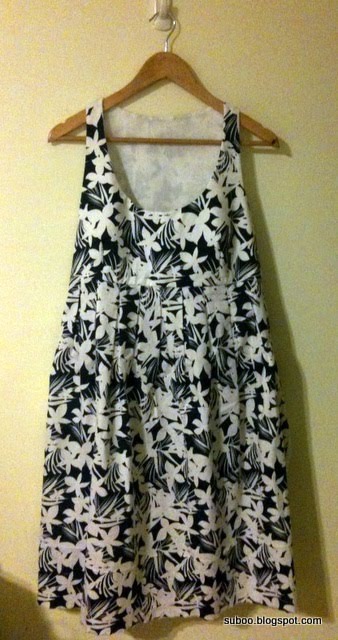
Finally - pleats!

The Result
I'm loving the look of the dress using the fabric but I have to say that after all that pleating work (did I mention that it took FOREVER?) I was really disappointed - the pleats have made the dress look really matronly.

It looks quite shapeless on the hanger but it gives you an idea of how it just isn't quite working

So now - what should I do??

I don't have any more of the fabric left to start over but unpicking the pleating will take a huge amount of time - probably longer than it took to do the pleating in the first place (and like I said, it took a really really really long time - there must seriously be an easier way!).

I think I might take leave of this particular project for a bit - it's causing me a bit of frustration to say the least.

Sigh.