Friday 22 October 2010

I should be a plumber

OK so maybe that's an exaggeration but I was horrified the other day when in the midst of cleaning out a bag full of jewellery I heard what sounded like something sliding against the porcelain of the sink. I turned around quick enough to see the flash of something shiny falling down into one of the little drainage holes in the sink.

My first thought was 'OMG what was that?', followed by 'OMG it better not be anything expensive!'. Since I have bits of jewellery all over the place I really wasn't sure if an earring was missing its other half or if a pendant had fallen off a necklace chain. Stress stress - what if it was a diamond??

My Ma advised me to ask a neighbour for help rather than call the plumber - neither of which were appealing to me since even though the neighbour in question is lovely, I just don't know him very well, and plumbers can be expensive - totally not worth it if the lost item was just a trinket!

I plugged up that particular sink and after a couple of days of being in denial and pretending it hadn't happened, I mentioned it to a workmate. Coincidentally, he had been doing some pipework under his house. According to him, it wouldn't be that difficult to fish something out of the sink if it hadn't been already washed away by running water (which I had made sure hadn't happened). As long as the piping was moderately modern and the person who installed it wasn't too heavy-handed, it would be a simple DIY job.

Apparently all you need to do is lay a few towels under the pipe, unscrew the screwy bits that join the pipes up (sorry don't know what the technical term for this is) and tip out whatever is caught in there.

It sounded good in theory, but I was dubious. After all, on TV, when you see a plumber go under a sink, he has a toolbox with spanners and screws and allsorts that are put to use. Could it really be as simple as that?

Turns out that yes, yes it is!


Top screwy bit unscrewed successfully!

I managed to unscrew both ends using a towel to protect my palms (doing it without really hurt!). My workmate failed to mention that the inside of the pipe was going to be gross and stinky, and I hadn't thought that far ahead since, y'know, I was dubious and all, so I quickly poured out the contents of the pipe into a bucket and restored the piping to all of its former glory. *bleurgh*

Turns out, it was an earring that had fallen in, and a cheap one at that. Probably wasn't worth the grossness of the whole experience, but what was worth it was learning how to do it. Sure, it was a lot easier than I thought it would be, but I've never been handy around the house so I felt pretty awesome.

Here's hoping that this random post ends up being helpful to some of you other non-handy people out there :)

Thursday 21 October 2010

Going dotty

I've found that no matter which fabric store you go to, there is always some sort of polka-dotted material around. My Ma absolutely loves it since she adores using polka-dots in her quilts.

Me, I fluctuate. I tend to think that it just has to be fit for purpose - Is it in fashion? Does it suit the style of the garment? Is it being used inappropriately for a large item (this giving anyone who looks at it a headache)?

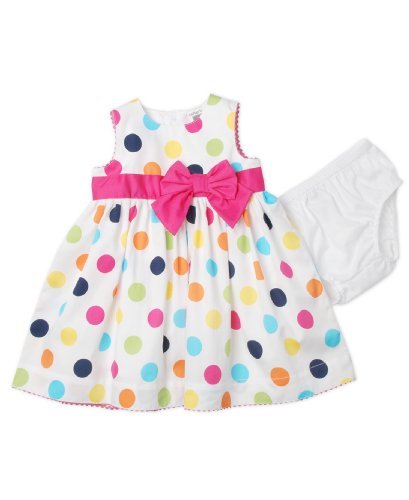
After trawling the interwebs though I think that polka-dots nearly always look great on little girls' dresses. Check some of these out.
Rare Editions Girls Pink Polka Dot Dress from Treasure Box Kids

Carter's Baby Dress, Baby Girls Polka Dot Dress from Depot.com


Bonnie Jean Baby Little Girls Fuchsia Polka Dot Spring Dress from Sophias Style


Aren't they all super cute? SY2's first birthday is coming up and I now have a few ideas up my sleeve... I just hope I have time before I head off on my holidays!

Thursday 14 October 2010

Burdastyle dress: 114-5/2010. Take 2.

So I wasn’t 100% happy with the Burda dress I made before and decided that I’d try to change a few things about it and make another version using a navy cotton with a large amoutnt of white print on it – I thought the use of white would make it a lot more summer-y.

I loved the print the moment I saw it!

The Plan
I thought it through and decided I wanted to do the following:

1. Make the back section more conventional instead of having the cross back pattern
2. Eliminate the need for 2 pieces for the front of the dress
3. Make the skirt either a gathered skirt or a pleated one, without the tiers.

1. The Back
This was fairly easy – I just used the original Burda pattern as a guide. I made sure that the tops of the shoulder straps still matched the pattern so they’d line up with the front shoulder straps, then drew a curved line from there to meet the underarm seam. I did this freehand since I didn’t know if there was a particular technique around on how to measure this up. It seemed like a logical enough approach in my mind.

2. The Front
Now this was a piece of cake. I just took the front piece and cut it on the fold (taking it in just a tad as the original pattern called for the 2 front pieces to overlap).

3. The Skirt
This step had me torn. Part of the reason I had picked the particular material was because it was thick enough not to need any lining. As a result, it was more likely to add bulk to the join and make me look a lot thicker around the waist. Based on this I reluctantly decided to have a go at pleating the skirt instead of gathering it. I don’t know about the rest of you, but I find pleating hard work! Still, I figured that avoiding doing it wasn’t going to make me any better at it so a-pleating I went.

The Execution
I started by drawing evenly spaced lines on the back of the material for the pleats. I had no idea how much material I needed and how to measure how many pleats to put in so I just decided that I would just pleat the length of material and then cut it to fit as the skirt option.

Pencil lines

I had a lot of trouble working out the best way of sewing these up. I ended up folding the pleats on the pencil mark, pinning them in place and then sewing up and down the seam using the machine foot as a measuring guide so that I'd be able to replicate the measurements across the skirt.

I really don't know if this was the best method but it seemed to kind of work...

So I kept repeating the pattern across the length of fabric I had set aside for the skirt and ended up with a consistent pleating pattern throughout.

On and on and on - it took ages!

I actually lie as I managed to get distracted along the way and incorrectly sew an extra seam where it shouldn't have gone. Urgh. Luckily it was close to one end of the fabric so I was hoping that I wouldn't need the whole length for the skirt - either way I was so exhausted from all the pleating that it was either pretend that it hadn't happened or chuck the whole project, so there are no pictures of the stupid thing to be posted :)

I then basted the skirt to the newly-fashioned bodice to get an idea of what the dress would look like.

Finally - pleats!

The Result
I'm loving the look of the dress using the fabric but I have to say that after all that pleating work (did I mention that it took FOREVER?) I was really disappointed - the pleats have made the dress look really matronly.

It looks quite shapeless on the hanger but it gives you an idea of how it just isn't quite working

So now - what should I do??

I don't have any more of the fabric left to start over but unpicking the pleating will take a huge amount of time - probably longer than it took to do the pleating in the first place (and like I said, it took a really really really long time - there must seriously be an easier way!).

I think I might take leave of this particular project for a bit - it's causing me a bit of frustration to say the least.

Sigh.