Thursday, 30 September 2010
Monday, 20 September 2010
Fabric in a can and pain everywhere...
New technology in clothing creation - fabric in a can.
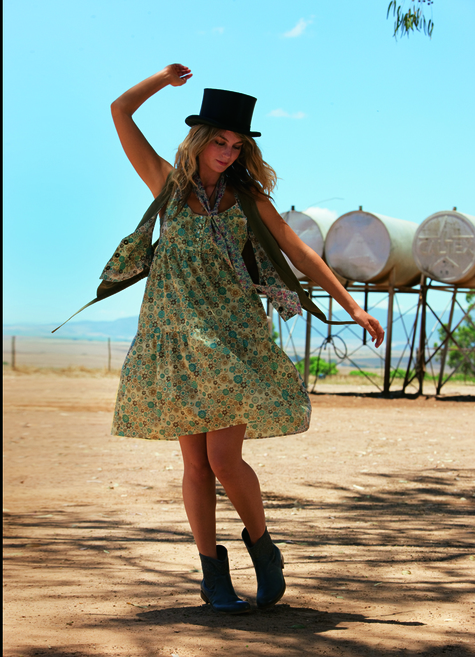
On a separate note, I'm off for a 2 week holiday tomorrow night and have spent the past 2 days in bed struck down with some nasty flu strain. My head/joints/throat hurts, and a summer dress for the trip based on the burdastyle tiered dress I previously made has been left unfinished on the dining table.
Not happy.
Panadol and sleep time.
Wednesday, 15 September 2010
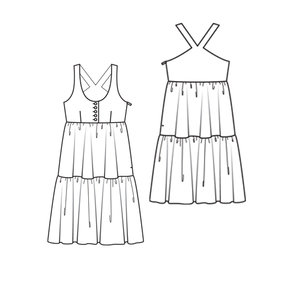
My first burdastyle dress: 5/2010 Tiered Mini Dress
I did have grand plans to make my first ever BurdaStyle attempt the One Dot Dress, but when I read the instructions a little better I realised that I didn't have a double stitch needle and even if I did, I wasn't sure where the second spool would sit on my sewing machine.
Due to my general impatience, I put that one in the 'think-about-it-later' pile and instead decided on pattern 114 from the 5/2010 issue, a tiered mini dress.
 As you can see, it's a great summer dress and Burda had it made up in a really nice Liberty print.

Photo courtesy of burdastyle
Seeing as quite a few people have said that Burda patterns aren't the easiest to follow, I wasn't going to splurge on expensive material and instead picked up some similarly patterned cotton from Spotlight.
After a bit of confusion around how the front buttonholes were supposed to work, I managed to figure it out:

The finished product (slightly crinkled)
I have to say that I was a little disappointed initially that the dress looks a little pregnant-y, but it's nothing a high-waisted belt won't fix. You just don't notice it too much on the Burda model since they've shown an action shot.
Perhaps it's my choice of material but I think that the darker material has taken a bit of the summer-y feel away from the dress.

Front and back.
Also not too sure about the cross-back - I have a sneaking suspicion that it might make most people look like they have swimmers' shoulders - but that aside, this design means that normal bras can't be worn without having the straps fully exposed. Not a great look.
As I mentioned, I wasn't sure what I was supposed to do with the buttonholes so I figured since the design had an invisible zip right up one side (talk about zipper foot issues!), the dress front didn't actually need to button up, so I ladder stitched the 2 front sections together and sewed on 3 buttons just for appearances. This bit probably took me almost as long as it did to sew up the rest of the dress!

Fake buttons
Overall I'm pretty happy with the dress for a first attempt but I wouldn't mind making a better version of this, with just one front section for the bust and removing the cross back. I've also found that the skirt section is very see-through as it isn't lined, so that might be something to consider next time.
Due to my general impatience, I put that one in the 'think-about-it-later' pile and instead decided on pattern 114 from the 5/2010 issue, a tiered mini dress.
 As you can see, it's a great summer dress and Burda had it made up in a really nice Liberty print.
Seeing as quite a few people have said that Burda patterns aren't the easiest to follow, I wasn't going to splurge on expensive material and instead picked up some similarly patterned cotton from Spotlight.
After a bit of confusion around how the front buttonholes were supposed to work, I managed to figure it out:

I have to say that I was a little disappointed initially that the dress looks a little pregnant-y, but it's nothing a high-waisted belt won't fix. You just don't notice it too much on the Burda model since they've shown an action shot.
Perhaps it's my choice of material but I think that the darker material has taken a bit of the summer-y feel away from the dress.

Also not too sure about the cross-back - I have a sneaking suspicion that it might make most people look like they have swimmers' shoulders - but that aside, this design means that normal bras can't be worn without having the straps fully exposed. Not a great look.
As I mentioned, I wasn't sure what I was supposed to do with the buttonholes so I figured since the design had an invisible zip right up one side (talk about zipper foot issues!), the dress front didn't actually need to button up, so I ladder stitched the 2 front sections together and sewed on 3 buttons just for appearances. This bit probably took me almost as long as it did to sew up the rest of the dress!

Overall I'm pretty happy with the dress for a first attempt but I wouldn't mind making a better version of this, with just one front section for the bust and removing the cross back. I've also found that the skirt section is very see-through as it isn't lined, so that might be something to consider next time.
Monday, 13 September 2010
Keeping things tidy (- ish)
Sunday, 12 September 2010
C25K Update
So I'm now up to Week 7 of the program and I'm actually managing to jog (at an incredibly slow pace) for 25 minutes. It's not fun and I haven't been converted to being a running fanatic but I must say I'm pretty proud of myself. Personally it's a huge achievement as I've never really had much stamina - I managed some decent sprinting when I was younger but that's been about it.
Still 3 weeks to go - not sure I'll make the 5k at the end as I'm going at a pretty slow pace (7.5 on the treadmill) but I figure once I get up to 30 mins I can always work on my speed :)
Still 3 weeks to go - not sure I'll make the 5k at the end as I'm going at a pretty slow pace (7.5 on the treadmill) but I figure once I get up to 30 mins I can always work on my speed :)
Monday, 6 September 2010
Wednesday, 1 September 2010
No zipper love
Quite a few of the patterns I've been looking at call for an invisible zip. Unfortunately the machine that I'm using didn't come with one so I decided to mosey on down to the shops to buy a invisible zipper foot. I saw a couple in stock and they all pretty much looked like the same assortment of bright plastic bits so I decided to buy the Birch branded ones since I was buying a few machine needles of the same brand.
I got home, opened up the packet and seriously could not make head or tail on how it all worked.
The instructions were highly useless. They listed what type of machine each adaptor (blue bit) was for but that didn't help since I had no idea which category (options were short shank, long shank, slant needle and low front) my machine fit in.
Thanks to the interwebs, I found a really helpful post from Kim of the All Things Mum blog that had a clear picture of how the foot is supposed to look when it's on the machine. Adaptor B for me - Hurrah!
It wasn't really all that hurrah though as I soon discovered. As you can see from the photo below, the foot fits well on the shank and the screwhole is visible on the right side of the foot.
On the left side of the foot is a whole other story.
That's right - the screw needs to be screwed into the hole that just isn't there! I tried to slide the adaptor section up or down but there was no way possible it was going to budge. I thought that maybe, just maaaayyybe, I would be able to use the foot without having to screw it in but I learnt pretty quickly that that wasn't going to work.
Looks like for now I'll continue using my normal zipper foot like I did for the Macaron dress - the result for that wasn't quite as 'invisible' as I'd like it to be but at least it gets the zip in.
I'd really like to use a proper invisible zipper foot though - without having to fork out to get an exorbitant fee on a metal foot specific to my machine (a Janome Decor Excel 5018). Why waste the moolah when there is a chance that I might be able to use a cheap ugly plastic one? ;D
Anyone have any ideas or come across the same problem?
I got home, opened up the packet and seriously could not make head or tail on how it all worked.
 |
| Contents of the packet |
The instructions were highly useless. They listed what type of machine each adaptor (blue bit) was for but that didn't help since I had no idea which category (options were short shank, long shank, slant needle and low front) my machine fit in.
 |
| Looking at this sure didn't help me work anything out |
Thanks to the interwebs, I found a really helpful post from Kim of the All Things Mum blog that had a clear picture of how the foot is supposed to look when it's on the machine. Adaptor B for me - Hurrah!
 |
| It actually fits! |
 |
| Yup that's where the screw goes |
On the left side of the foot is a whole other story.
 |
| Something isn't quite right here... |
That's right - the screw needs to be screwed into the hole that just isn't there! I tried to slide the adaptor section up or down but there was no way possible it was going to budge. I thought that maybe, just maaaayyybe, I would be able to use the foot without having to screw it in but I learnt pretty quickly that that wasn't going to work.
Looks like for now I'll continue using my normal zipper foot like I did for the Macaron dress - the result for that wasn't quite as 'invisible' as I'd like it to be but at least it gets the zip in.
I'd really like to use a proper invisible zipper foot though - without having to fork out to get an exorbitant fee on a metal foot specific to my machine (a Janome Decor Excel 5018). Why waste the moolah when there is a chance that I might be able to use a cheap ugly plastic one? ;D
Anyone have any ideas or come across the same problem?
Subscribe to:
Comments (Atom)

